Wondering how to drain a water softener? Looking for other water softener maintenance tips? We’ve got you covered.
In truth, water softeners require relatively little maintenance, but keeping an eye on the water in the tank and a few other aspects of the unit is key.
Water softeners typically require periodic draining to flush out accumulated minerals and maintain effectiveness. Regular draining helps prevent buildup and ensures optimal performance.
In this article we will discuss:
Here at WaterSmart, we have over 25 years of experience working with water softeners, and we'd love to share our expertise with you!
1. How To Drain a Water Softener
If you look in your water softener and notice water in the tank, what should you do?
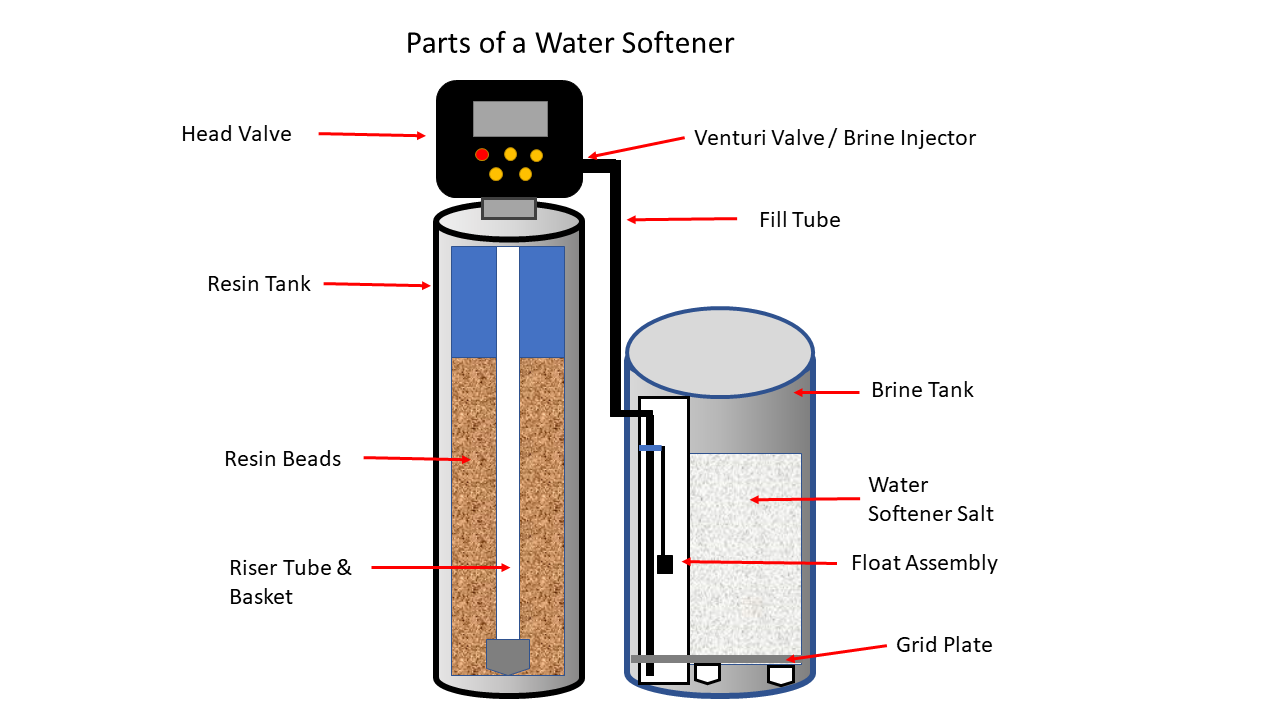
While your water softener brine tank should never be full of water, some units can have a measure of moisture present.
If you have an older water softener, it might have a "wet" brine tank. In this case, water will be present in your brine tank all the time. This type of brine tank typically fills up to about 11-23 litres (3-6 gallons) of water, the equivalent of 15-25 cm (6-10 inches).
A newer softener will have a dry brine tank. In this case, you’ll only have water in your tank an hour or two before your softener is ready to go through a regeneration cycle. When your softener is in between cycles, it shouldn't have water in it.
So, how to drain a water softener? Here are your main options:
(A) SCOOP OUT THE WATER
Scoop out the water from your water softener with a cup or bucket.
Get a clean bucket or cup: Find a bucket that’s small enough to fit inside your brine tank or use a large scoop or bowl.
Scoop out the water: Scoop out the water manually and dump it into a larger container to dispose of down the drain.
An empty water softener tank.
(B) Use a shop VACUUM
A shop vacuum, also known as a shop vac, can suck the water from your water softener tank.
Not all shop vacs are designed to suck up water, so make sure that you use one that works for both wet and dry applications.
(C) REMOVE tank AND DUMP WATER
Softener water doesn’t pose an environmental hazard, so feel free to disconnect your tank and dump the water down the drain.
To do this, you’ll need to remove the brine well. This is the long cylinder that holds the safety float inside your brine tank. Here are the steps to follow:
Remove the float: Before you remove the brine well, take out the float located inside the brine tank. (If your softener has an overflow elbow, you will need to remove that too).
Pull out the cylinder: Carefully pull out the cylinder that contains the safety float.
Disconnect the fill tube: If you have a side-by-side water softener model, you’ll need to disconnect the fill tube that connects the brine tank to the head valve and the brine tank's overflow hose.
Dump the water: Lift up the brine tank and dump the water down a drain.
(D) MANUAL REGENERATION CYCLE
Your water softener might allow for a manual regeneration.
Activate a manual regeneration cycle by pushing and holding the "regenerate" button to empty the softener. During regeneration, your water softener automatically sucks all of the water out of the brine tank.
When the regeneration cycle starts, push the button a second time to skip the brine cycle. When your tank is empty, push the button to skip all of the other cycles and return your water softener back to normal.
This may not be uniform for all models. Be sure to check your manual, or contact a professional for assistance.
2. How to refill the salt tank
To keep your water softener working at maximum efficiency, you need to fill it with the proper amount of salt.
Here are three simple rules to follow:
Keep your brine tank at least one-quarter full of salt at all times
Don't fill your salt up past 4 to 6 inches below the top of your brine tank.
Make sure that your salt level always stays a few inches above the water level in your brine tank.
Check your salt level in your brine tank at least once per month to know when it is time to add more salt.

Your water softener can’t work without salt.
3. How to remove salt bridges
A salt bridge is one of the most common water softener issues.
A bridge occurs when your salt solidifies in an arc above your water level, creating an empty cavity between the salt and the water. Possible causes included high humidity or using the wrong kind of salt in your tank.
When this happens, the brine solution is not able to reach the salt in your tank, so your water softener cannot do its job.
Break up the salt bridge by softly tapping on the outside of the tank with a rubber mallet. You can also pour warm water over the bridge to dissolve it. If this doesn't break up the bridge, then use a long tool, such as a broom handle to chop through the salt bridge.
Once you have broken up the bridge, use up the leftover salt and then clean out your brine tank. Before you clean your tank, wait four hours until a brine solution has been produced and then manually regenerate your softener.

Salt bridges must be collapsed to help your softener work properly.
4. How to clean your water softener
If you own a newer water softener, you will only need to clean it once every 5 to 10 years. Older units, though, should be cleaned every year.
Here’s how to clean your water softener:
Empty the tank: You need to either siphon or dump all of the water out of your tank and then discard any excess salt. If you have any remaining blocks or bridges, dissolve them in hot water.
Clean the Interior: Pour 4-8 litres of water with lots of dish soap in the tank. Take a brush with a long handle and scrub all the sides and bottom of the inside of the tank.
Rinse the Tank: Dump the soapy water and then rinse the inside with clean water.
Disinfect with Bleach: Next, mix 1/4 cup of household bleach with 8-11 litres of water and pour it into the tank. Carefully stir the bleach solution around and then let it sit for about 15 minutes. Dump out the bleach solution and then rinse the tank again with clear water.
Refill Your Tank: Fill up your tank with salt and water as normal. It’s a good idea to wait for a few hours before starting the regenerating cycles again as the salt will need time to dissolve into the water.

Watersmart offers all home water solutions!
5. FAQ
Can I drain my water softener into the ground?
No, it is not recommended to drain water softener discharge into the ground without proper consideration and potentially necessary permits.
The discharge from water softeners typically contains high levels of salt and other minerals that can harm soil and plants, contaminate groundwater, and disrupt the local ecosystem if not properly managed.
Instead, it's advisable to connect your water softener's discharge line to a suitable drainage system, such as a sewer line or a designated drainage area approved by local regulations.
You may also consider alternative options for discharging the water, such as directing it to a sump pump pit or a dry well if permitted by local authorities and environmental regulations.
Can I discharge my water softener into my septic tank?
Discharging water softener effluent into a septic tank is generally acceptable in many cases, but it's important to proceed with caution and consider several factors:
Septic Tank Capacity: Ensure that your septic tank has the capacity to handle the additional volume of water from the water softener. Overloading the septic system can lead to issues such as backups and system failure.
Salt Levels: Water softener discharge contains high levels of salt, which can negatively impact the balance of microorganisms in the septic tank and hinder its effectiveness. Excessive salt can also affect the soil absorption field's ability to properly treat wastewater.
Local Regulations: Check local regulations and guidelines regarding the discharge of water softener effluent into septic systems. Some areas may have restrictions or specific requirements for this type of discharge.
Maintenance: Regular maintenance of both the water softener and the septic system is essential to ensure proper function and prevent problems. This includes periodic inspection, cleaning, and, if necessary, adjusting the settings of the water softener to minimize salt discharge.
Monitoring: Keep an eye on the performance of your septic system after connecting the water softener discharge. Look out for any signs of system overload, such as slow drains or foul odours, and address them promptly.
Before connecting your water softener to your septic tank, it's advisable to consult with a professional plumber or septic system specialist to assess compatibility and ensure compliance with local regulations.
They can provide guidance on proper installation, maintenance, and monitoring to minimize any potential negative impacts on your septic system and the environment.

Don’t know how to drain a water softener? TRUST the PROFESSIONALs at Watersmart
If you need your water softener repaired in the Kitchener-Waterloo region, you can trust WaterSmart.
We'd be happy to help you with any repair, service or drain installation on any type of water softener you have, at a reasonable rate.
Our expert, experienced plumbers will come to your home, take a look at your system, and advise you about the best course of action.
Whenever possible, we will fix your existing unit, and if you need a replacement, we can advise you on what type of softener would best meet your needs.
We even offer financing.
“Excellent customer care! From the initial phone call to the installation - the entire experience was helpful and focused on customer satisfaction.”